TestFlight Release Management for Indie iOS Developers

TestFlight release management means treating each beta build as a release candidate for one version. Decide which tasks the build should contain, test with internal testers before external groups, sort every piece of feedback into “blocks this release,” “next version,” or “no action,” and confirm that release notes, screenshots, and review notes still match the build you submit. It covers the stretch between “the build uploaded” and “this version is ready for App Review.”
For indie developers, that middle stage can get messy fast. A build may be processing in App Store Connect. Internal testers may be using one build while external testers are waiting for another. Feedback may arrive as screenshots, notes, crash reports, emails, or messages. Meanwhile, release notes, screenshots, metadata, review notes, and final submission tasks still need attention.
LaunchBuddy keeps that work on the release itself: the tasks a build should contain, the feedback you decided to act on, and the checklist you run before submitting.
Why TestFlight needs release management
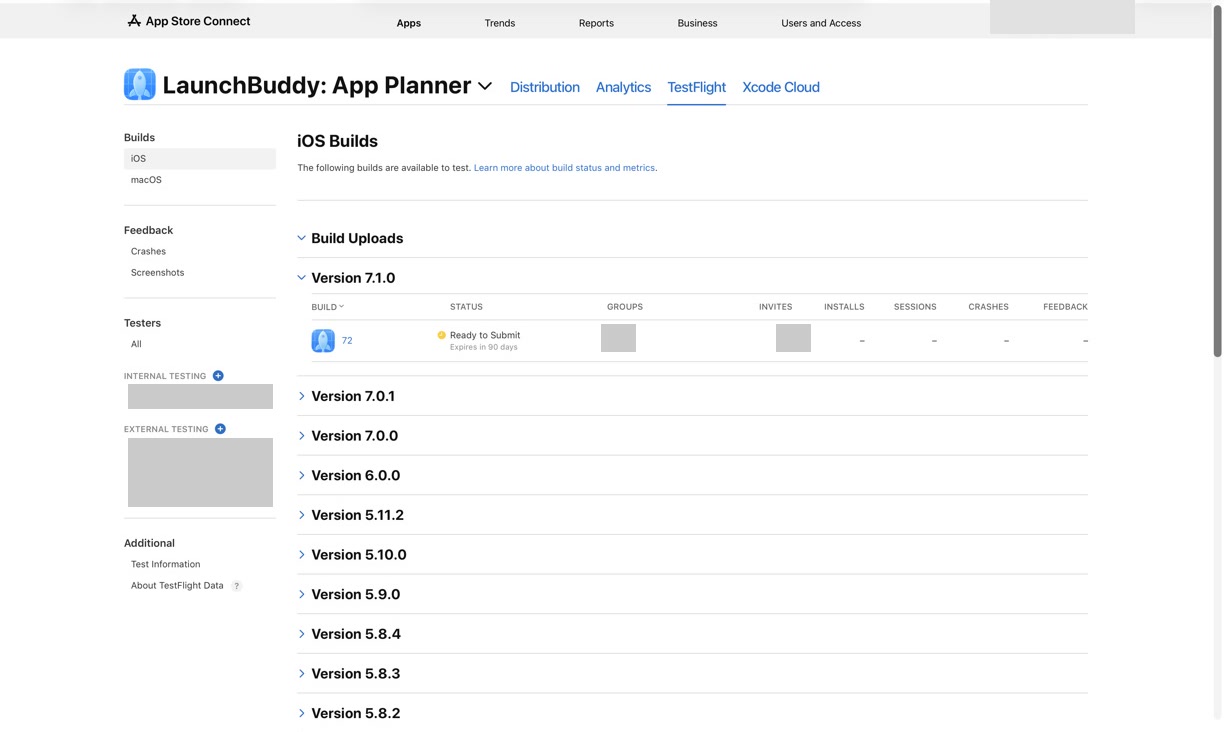
TestFlight is excellent at distributing beta builds. It gives you a way to upload builds, invite testers, organize testing groups, collect feedback, and prepare confidence before a version reaches the App Store.
But TestFlight is not a complete release management system. It does not know:
- Which tasks are supposed to ship in the next version
- Which build is the real release candidate
- Which tester feedback should block submission
- Which feedback should become follow-up work
- Whether release notes still match the selected build
- Whether screenshots, metadata, and review notes were updated after testing
- Why a build was skipped, expired, or replaced
That is why “upload to TestFlight” should not be treated as a single checkbox. TestFlight release management gives the beta stage a clear workflow, so every build, task, and feedback item has a place.
What a TestFlight release management workflow includes
A strong TestFlight workflow connects three things:
- The release plan
- The App Store Connect build state
- The tester feedback that affects the final version
For each release, you should be able to answer:
- What version are we testing?
- Which build is currently in TestFlight?
- Is this build for internal testing, external testing, or final release validation?
- What feedback has arrived?
- Which feedback blocks App Review submission?
- Which tasks were completed after beta testing?
- Are release notes and screenshots accurate for the selected build?
- What still needs to happen before submitting to App Review?
If those answers live across App Store Connect, Notes, email, screenshots, and memory, the release gets harder to trust. If they live with the version, the workflow becomes easier to repeat.
Start with a release, not a build number
The most common TestFlight mistake is treating each uploaded build as the organizing unit. Build numbers matter, but the release version is usually the better container for planning.
Before uploading or distributing a beta build, create a release and define:
- Version number
- Release goal
- User-facing features
- Bug fixes
- Known risks
- Testing scope
- Internal tester group
- External tester group, if used
- Submission deadline or launch timing, if relevant
Then attach the work that belongs to that release. A TestFlight build is one artifact inside the release, not the release itself.
For example, version 2.4 might include:
- A new onboarding flow
- A fix for subscription restoration
- Updated App Store screenshots
- AI-assisted release notes
- External beta testing for the new onboarding path
- App Review notes explaining the subscription test account
When the release is the center, you can replace build 184 with build 185 without losing the context of why the version exists.
Track TestFlight status next to release tasks
Apple’s TestFlight overview explains the core beta testing flow: upload a build to App Store Connect, assign testers or groups, collect feedback, and use the build for testing before release.
For day-to-day project management, the useful question is not only “how does TestFlight work?” It is “what status should my release plan track?”
A practical TestFlight status list includes:
- Build uploaded
- Build processed
- Export compliance reviewed, if needed
- Internal testers assigned
- Internal testing started
- Internal testing complete
- External testing submitted for beta review, if needed
- External testers assigned
- External feedback reviewed
- Blocking feedback resolved
- Final release candidate selected
- Release notes checked against the selected build
- App Store version build confirmed
This does not mean duplicating every App Store Connect field manually. It means making the important release state visible next to the tasks that depend on it.
With LaunchBuddy’s App Store Connect integration, TestFlight and App Store Connect work can stay closer to your project plan. Instead of jumping between tools just to remember what is ready, you can keep release tasks, checklists, and status in the same workflow.
Separate internal testing from external testing
Internal and external TestFlight testing have different jobs.
Internal testing is usually for fast confidence:
- Does the build install?
- Does the main workflow work on real devices?
- Did a risky fix actually solve the problem?
- Are there obvious crashes or launch blockers?
- Is the app ready to show to a wider group?
External testing is usually for broader feedback:
- Do real users understand the new feature?
- Does onboarding make sense?
- Are instructions clear?
- Are there device or account states you missed?
- Is the release valuable enough to ship?
Do not mix those goals into one vague “testing” checkbox. In your release plan, track them separately:
Internal testing:
- Build:
- Testers:
- Flows to verify:
- Blocking issues:
- Result:

External testing:
- Build:
- Tester group:
- Feedback themes:
- Blocking issues:
- Follow-up tasks:
- Result:
This helps you avoid a common beta problem: treating feedback from one testing stage as if it answers every release question.
Turn TestFlight feedback into release decisions
TestFlight feedback is only useful if it changes the release in a visible way.
When feedback arrives, sort it into three groups:
1. Blocks this release
These are issues that should stop submission:
- Crashes
- Broken onboarding
- Failed purchases or subscription restoration
- Data loss
- Login problems
- Misleading release notes
- A feature that does not work as promised
Blocking feedback should become tasks inside the current release. The release should not be considered ready until those tasks are resolved, deferred with a clear reason, or the feature is removed from scope.
2. Should ship soon, but not now
Some feedback is important but does not need to delay this version:
- Usability improvements
- Nice-to-have polish
- Copy changes that are not misleading
- Edge cases that affect a small group
- Larger feature requests
Create follow-up tasks and attach them to the next release or backlog. This keeps the current release moving without losing the feedback.
3. Useful context, no action yet
Not every comment needs a task. Some feedback helps you understand how testers think about the app:
- Confusing terminology
- Different expectations than you had
- Repeated questions
- Positive signals about a feature
- Notes that may affect App Store positioning
Save the useful context with the release. It can help later when you write release notes, update screenshots, or improve metadata.
Use AI to summarize beta feedback carefully
AI can help with TestFlight release management when it is grounded in real release context. It can summarize patterns, draft release notes, and turn rough tester comments into clearer tasks.
AI is useful for:
- Summarizing feedback themes
- Grouping similar issues
- Turning technical fixes into user-facing release notes
- Drafting App Review notes for non-obvious flows
- Suggesting follow-up tasks from beta comments
- Rewriting metadata or onboarding copy ideas
The safe rule is simple: AI can help draft and organize, but it should not decide what is true.
A practical prompt might look like this:
You are helping prepare an iOS app release after TestFlight testing.

Release context:
- App:
- Version:
- Build:
- Release goal:
- Completed tasks:

TestFlight feedback:
- [Paste tester feedback here]

Create:
1. Blocking issues that should be checked before App Review.
2. Non-blocking follow-up tasks for a future release.
3. A short summary of feedback themes.
4. Draft user-facing release notes based only on completed work.

Rules:
- Do not invent features.
- Do not treat unclear feedback as confirmed bugs.
- Keep release notes accurate for the selected build.
For a deeper writing process, read the guide to AI release notes for iOS apps. The same principle applies to TestFlight feedback: AI works best when the release context is already organized.
Keep release notes tied to the tested build
Release notes often drift during beta testing.
You may upload build 184 with one feature set, then fix two bugs in build 185, then remove a risky improvement in build 186. If release notes were drafted after the first build, they may no longer describe the version users will receive.
Before submitting to App Review, check:
- Which build is selected for the App Store version?
- Did every release note item ship in that build?
- Did beta feedback cause any feature to be removed?
- Did a bug fix create a user-visible improvement worth mentioning?
- Are technical fixes translated into user benefits?
- Did you remove internal beta details that users do not need?
LaunchBuddy’s AI features can help draft the first version of the notes, but the final check should stay tied to the selected build. If a sentence does not match that build, rewrite it or remove it.
Connect TestFlight to App Store Connect submission work
TestFlight is not separate from App Store submission. It is the evidence-gathering stage before the final App Store Connect checklist.
After beta testing, review the submission tasks that may have changed:
- App Store screenshots
- App preview videos
- App description
- Subtitle and keywords
- Promotional text
- App Privacy answers
- Age rating
- Review notes
- Demo account details
- In-app purchase or subscription notes
- Release timing
This is why TestFlight release management should connect to your broader App Store Connect release checklist. Beta testing may reveal that the app is ready, but it may also reveal that your App Store page needs to explain the release differently.
A reusable TestFlight release management checklist
Use this checklist for each beta release:
Release setup:
- Version defined:
- Release goal written:
- Scope confirmed:
- Test plan created:

Build:
- Version/build number checked:
- Archive uploaded:
- Build processed:
- Export compliance reviewed:
- Correct build selected for testing:

Internal TestFlight:
- Internal testers assigned:
- Critical flows tested:
- Crashes reviewed:
- Blocking issues created as tasks:
- Internal testing complete:

External TestFlight:
- External group selected:
- Beta review status checked:
- Public link or invitations confirmed:
- Feedback reviewed:
- Blocking issues resolved:
- Follow-up tasks created:

AI-assisted work:
- Feedback summarized:
- Release notes drafted:
- Release notes verified against final build:
- App Review notes drafted:

App Store Connect:
- Final build selected:
- Metadata reviewed:
- Screenshots verified:
- Privacy and compliance checked:
- Review notes ready:
- Release timing chosen:

Submission:
- Submit for review:
- Track review status:
- Save post-launch follow-up:
The exact checklist can change by app. A small bug fix may not need external testing. A major subscription update may need more review notes, tester groups, and follow-up tasks. The important part is using a repeatable structure instead of starting from memory every time.
What TestFlight release management looks like in practice
Imagine you are preparing version 3.1 of an indie productivity app.
The release includes:
- A redesigned project dashboard
- A sync reliability fix
- A new onboarding step
- Updated screenshots
- AI-drafted release notes
Without a TestFlight release workflow, the work might look like this:
- Build 210 uploaded to TestFlight
- One tester reports onboarding confusion in a message
- Another tester sends a screenshot of a layout issue
- You fix the layout and upload build 211
- Release notes still mention the first onboarding copy
- Screenshots are still based on build 210
- App Review notes are copied from the previous release
Nothing looks disastrous, but the release is no longer clean.
With TestFlight release management, the version becomes easier to trust:
- Version 3.1 has a release goal and checklist
- Build 210 is marked as internal beta
- Onboarding feedback becomes a task
- Layout feedback becomes a blocking fix
- Build 211 becomes the release candidate
- AI drafts release notes from completed tasks
- Release notes are verified against build 211
- Screenshots are checked against the final UI
- App Review notes are updated before submission
The release did not become heavier. It became easier to see.
Frequently asked questions
How many testers can I add in TestFlight?
Up to 100 internal testers, who must be members of your App Store Connect team, and up to 10,000 external testers invited by email or a public link. External testing needs Beta App Review approval first, which usually applies to the first build of each version.
Should I submit the exact build I tested in TestFlight?
Yes. Submit the build number your testers signed off on; you can select it for the App Store version without uploading again. If you change code after testing, upload a new build and run at least your internal test pass on it before submitting.
How LaunchBuddy helps with TestFlight release management
LaunchBuddy is not trying to replace TestFlight or App Store Connect. Those tools remain the source of truth for Apple’s beta testing and submission process.
LaunchBuddy helps manage the work around those tools:
- Organize iOS projects and Xcode tasks
- Group work into release versions
- Reuse TestFlight and App Store submission checklists
- Keep App Store Connect work visible beside release tasks
- Track feedback as blocking work or future follow-up
- Use AI to draft release notes and summarize release context
- Keep project and release context available across iPhone and Mac
That combination matters because beta testing is not only about distributing a build. It is about deciding whether the version is ready, what changed because of testing, and what still needs to happen before users see it on the App Store.
For the bigger picture, read iOS app release management and App Store Connect project management. TestFlight is one stage in that larger workflow, but it is often the stage where release confidence is won or lost.
Ship better betas, then ship better releases
TestFlight release management gives beta testing a home. Instead of treating feedback, build status, release notes, and submission tasks as separate chores, connect them to the version you are preparing.
Start with the release. Track the build. Separate internal and external testing. Turn feedback into decisions. Use AI for drafts and summaries, then verify everything against the final build before App Review.
That is the workflow LaunchBuddy is designed to support: less context switching, clearer releases, and a calmer path from TestFlight to the App Store.