App Store Connect App Record: Avoid Identifier Mistakes
To create an App Store Connect app record, confirm your platform plan and identifiers first, then go to Apps, select the add button, choose New App, enter the platforms, name, primary language, bundle ID, SKU, and user access, and select Create. The record should appear with the status Prepare for Submission.
Do this before uploading a build. The form is short, but its fields don’t carry equal risk: the SKU is fixed as soon as the record is created, the bundle ID becomes fixed after a build upload, and a multi-platform decision can determine whether customers see one universal-purchase product or separate apps.
Use the pre-creation record, field-by-field verification, and first-release handoff below so a five-minute form doesn’t create a long-lived identity problem.
Decide whether this is one app record or several
Start with the customer relationship between platforms, not with whichever target is ready first.
Apple’s new-app instructions say to use a single record when related platform apps should be offered as one purchase. Those platform versions share a bundle ID while keeping platform-specific information where App Store Connect supports it.
Ask:
- Should one purchase cover the related iPhone, iPad, Mac, Apple TV, or Apple Vision versions?
- Are these versions one product identity, or genuinely separate products with different audiences and roadmaps?
- Can the platform targets use the same bundle ID?
- Will shared app-level information remain truthful for every platform?
In the creation form, iPhone and iPad belong to the single iOS platform selection; iPad isn’t a separate platform checkbox. Apple also treats a watch-only app as part of iOS in App Store Connect, though a watch-only app can’t be part of a universal purchase.
Don’t create separate records merely because two targets are being developed at different speeds. Apple says separate records can’t later be merged. Its platform guide also warns that after at least two platform versions are approved, the app remains a universal purchase and a single platform version can’t be removed from that record.
If this decision needs more analysis, use the universal purchase guide before creating anything.
Freeze the identifiers before opening the form
Four similar-looking values play different roles:
| Field | What it identifies | Customer-visible? | Change boundary |
|---|---|---|---|
| App name | The localized product name | Yes | Editable before review and later when version status permits |
| Bundle ID | The app across signing, builds, and App Store Connect | No | Can’t be changed after a build is uploaded |
| SKU | Your internal record key | No | Can’t be changed after the app is added |
| Apple ID | Apple’s generated numeric identifier for the record | Indirectly, in the App Store URL | Generated at creation and not editable |
Apple’s app information reference is the authority for these boundaries. It says the app name must be 2–30 characters. The SKU may contain letters, numbers, hyphens, periods, and underscores, but it can’t start with a hyphen, period, or underscore.
The bundle ID deserves a separate check. It must match the app’s Xcode target. Apple associates an uploaded build with an app and version record using its bundle ID and version number; the build string identifies the individual build. The version number versus build number guide explains that relationship in detail.
Use a pre-creation record:
Product:
App Store name:
Primary language:

Platforms selected now:
Platforms planned later:
One universal purchase? Yes / No
Reason:

Xcode target:
Xcode bundle identifier:
Registered App ID — Bundle ID value:
App Store Connect bundle ID:

SKU:
SKU naming rule:

User access: Full / Limited
Limited-access users:

Owner:
Second checker:
Decision date:
The Xcode bundle identifier, the registered App ID’s Bundle ID value, and the App Store Connect Bundle ID should be identical. Don’t compare the full signing App ID, which can include a team prefix, with the bare bundle identifier. The generated numeric Apple ID in App Store Connect is another identifier altogether.
Review the SKU character by character rather than treating it as disposable metadata.
Complete the prerequisites
Before creating the record, verify four gates.
1. The latest agreement is signed
Apple doesn’t allow a new app to be added until the Account Holder has signed the latest agreement in the Business section. If New App is unavailable, check the agreement state before troubleshooting the browser.
2. Your role can create the record
The required role is Account Holder, Admin, or App Manager. A Developer can upload builds after an app has been added, but Apple’s current role rules don’t list Developer as sufficient to create the record.
3. The explicit App ID exists
The bundle ID picker needs the intended identifier. Apple’s App ID registration guide instructs the Account Holder or an Admin to register an explicit App ID whose bundle ID matches the Xcode target, then enable the capabilities the app uses.
Don’t select a convenient identifier and plan to repair it after upload. Capabilities, signing, the Xcode target, and the App Store Connect record should describe the same app.
4. The access scope is deliberate
App Store Connect offers Full Access or Limited Access for the app. With Limited Access, select the users who should see it. Apple notes that Account Holder, Admin, Finance, and Access to Reports users can still view all apps because their app access can’t be limited.
Treat this as access scoping, not secrecy from account-wide roles. Record who needs the app for development, App Review preparation, customer support, marketing, or reporting, then choose the narrowest workable scope.
Create the App Store Connect app record
Once the decision record passes review:
- Sign in to App Store Connect and open Apps.
- Select the add button in the upper-left corner.
- Choose New App.
- Select the platform or platforms represented by this record.
- Enter the customer-facing app name.
- Choose the primary language used as the metadata fallback when a storefront doesn’t have a localization.
- Select the bundle ID that matches the registered explicit App ID and Xcode target.
- Enter the internal SKU exactly as approved.
- Choose Full Access or Limited Access and, for limited access, select the intended users.
- Compare every value with the pre-creation record.
- Select Create and resolve any missing-information messages.
For an organization’s first app, Apple may also offer a developer-name choice. That is a separate durable decision: Apple’s developer-name instructions say an organization can set it only while adding its first app, and it can’t be edited later. An individual developer doesn’t get that choice; the developer name is the individual’s legal name.
After creation, confirm that the app appears in Apps with Prepare for Submission status. Creation isn’t submission, and it doesn’t upload a binary or send anything to App Review.
Save a creation receipt before uploading
Reopen the record instead of trusting the success screen. Save a compact receipt:
Created at:
Created by:
App Store Connect status: Prepare for Submission

App name:
Platforms:
Primary language:
Bundle ID:
SKU:
Apple ID:
User access:

Compared with Xcode target by:
Mismatch found: Yes / No
First planned version:
Next action:
This receipt separates three states that teams often blur:
- Record created: the app identity exists in App Store Connect.
- Build uploaded: Apple has received and processed a binary associated with that identity.
- Version submitted: a build and required information have been added to a draft and sent to App Review.
Only the first state is complete at this point.
Fix a mismatch before the first upload
Run this check while the record is still empty:
| Finding | Safe next action |
|---|---|
| App name needs work | Edit it before review; confirm that the intended localized name is available |
| Wrong primary language | Correct it and review the fallback effect on planned localizations |
| Wrong access scope | Update app access so only the intended users can work with the record |
| Bundle ID doesn’t match Xcode | Stop the upload and reconcile the Xcode target, registered App ID, and record |
| SKU has a typo | Don’t upload a build while deciding how to recover; the SKU itself isn’t editable |
| Separate records were planned for a universal purchase | Stop and resolve the record model before either product accumulates builds or customers |
Avoid using app removal as a casual undo button. Apple’s remove-an-app rules include eligibility conditions and lasting consequences: removing a record loses ownership of its name, its SKU can’t be reused in the same organization, and its bundle ID can’t be reused if a build was uploaded.
If the intended app name is unavailable, Apple documents two paths when your own account already uses it: rename the existing app through an eligible update, or remove that record if it qualifies. If another developer uses a name to which you hold trademark rights, Apple provides a claim process. Don’t alter identifiers simply to work around a naming dispute.
Hand the record to the first release
The new record is a container, not a launch-ready product page. Next:
- Create the first platform version and confirm its version number.
- Prepare the required product-page, privacy, age-rating, pricing, availability, and App Review information.
- Archive a release candidate whose bundle ID and version match the intended record.
- Upload through an Apple-supported workflow.
- Wait for processing, then verify the app, platform, version, and build string.
- Test through TestFlight when appropriate.
- Complete a release check before adding the version to an App Review submission.
The broader iOS app launch checklist covers the work beyond identity creation. For copy and storefront fields, use the App Store metadata management guide.
Mirror the result in LaunchBuddy without confusing the systems
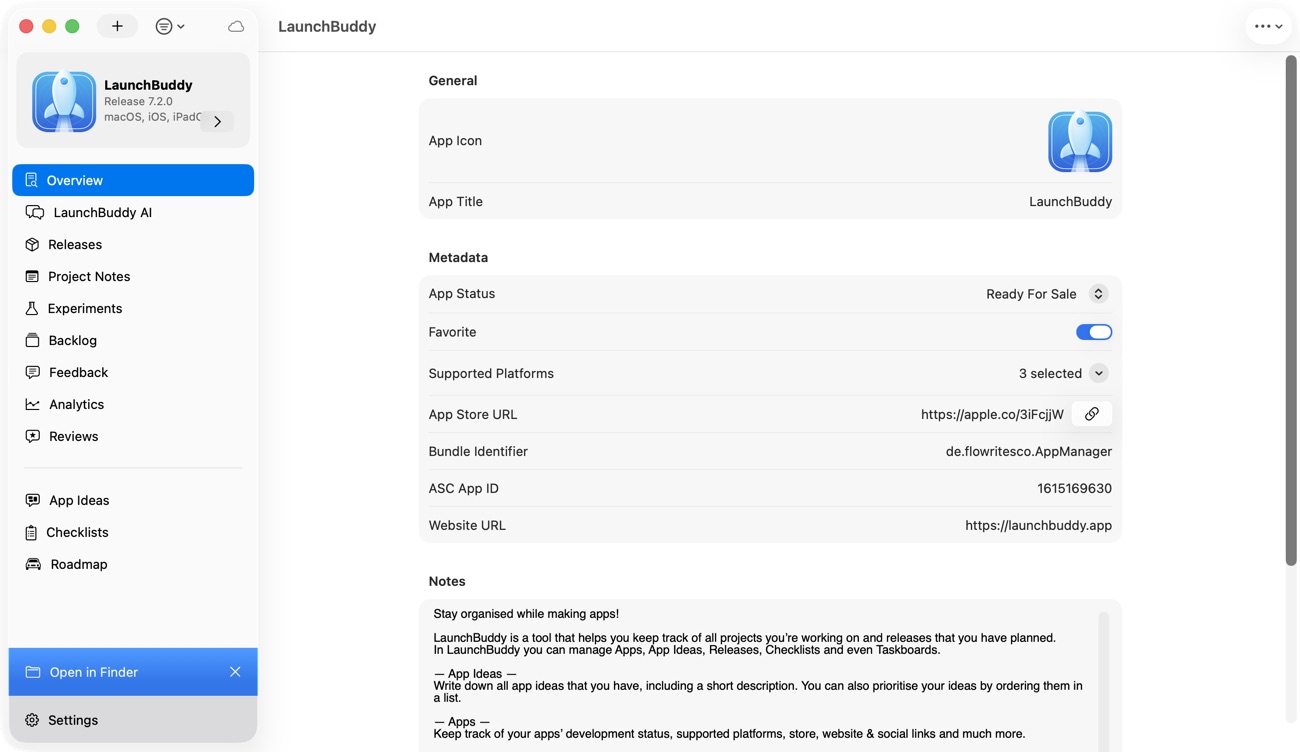
App Store Connect remains the authority for the official record, identifiers, builds, product information, and submission. LaunchBuddy doesn’t create the Apple record, register an App ID, configure signing, or upload a build.
Its useful role starts after the identity decision: create the corresponding app and first release, keep the creation receipt in project context, and turn the remaining launch checks into release tasks. The LaunchBuddy overview can keep the bundle identifier and App Store Connect app ID visible beside the app’s planning information.
LaunchBuddy’s Free plan supports up to two apps and two releases, with default App Store submission checklists and iCloud sync. Pro adds unlimited apps and releases plus custom reusable checklists. These planning features don’t require App Store Connect API credentials; credentials are for connected features such as reviews, selected analytics, and release-note uploads.
Create once, verify twice
The safest App Store Connect app record is boring: its product model is settled, its bundle ID matches in every system, its SKU follows a durable convention, and its access scope is intentional. Create it only after those decisions are written down, then reopen it and verify the receipt before the first build makes the identifier relationship harder to change.
Download LaunchBuddy and organize the first release around your verified app record.