TestFlight Beta App Review: Submit, Track, and Recover
TestFlight Beta App Review is the approval step that can stand between an uploaded build and external testers. In App Store Connect, add the build to an external testing group, complete its What to Test information, choose whether testers should be notified automatically, and select Submit Review when shown. External testing can start only after any required review is approved.
Treat this as a build-specific handoff, not a generic beta-program setup task. Record the version and build, verify the review path before submission, follow the status in App Store Connect, and keep tester notification separate from approval.
TestFlight Beta App Review in one workflow
| Stage | App Store Connect evidence | Your next action |
|---|---|---|
| Prepare | Intended build is processed and test information is current | Run an internal pass and verify reviewer access |
| Submit | Build is added to the external group | Select Submit Review if App Store Connect requires it |
| Wait | Waiting for Review or In Beta Review | Monitor the status; don’t replace the build without a build-specific reason |
| Resolve | Rejected and an issue appears in App Review | Read the issue, correct metadata or the binary as required, reply, and resubmit |
| Distribute | Ready to Test or Testing | Notify testers manually if automatic notification was off |
| Verify | An intended tester can install the exact build | Start the planned test and collect build-attributed evidence |
Apple’s build-status reference is authoritative for the live state. A spreadsheet or release task can preserve context, but it shouldn’t overwrite or reinterpret the status shown there.
1. Prepare the build before external review
First test the uploaded build internally. Beta App Review isn’t a substitute for checking launch, sign-in, the primary beta flow, and any non-obvious account or hardware requirements yourself.
Create a compact review record:
App:
Version and build:
External group:
Beta goal:
Primary path:
Required account, entitlement, device, or service:
Known limitation:
What to Test updated:
Review information verified:
Notification choice:
Owner:
Then confirm these prerequisites in App Store Connect:
- An internal testing group exists. Apple requires one before you create an external group.
- The intended external group exists and has the correct audience.
- The processed build is the one you actually tested.
- Export-compliance or other required actions aren’t still blocking the build.
- Beta App Description, feedback email, and contact details are current, along with demo access when the reviewed flow requires it.
- What to Test describes this build rather than the whole product roadmap.
The TestFlight test information checklist covers those fields in detail. For build-specific instructions, use the TestFlight What to Test examples.
Don’t put passwords in What to Test, public notes, or general release tasks. When review requires a demo account, use Apple’s dedicated TestFlight App Review fields and verify the account from a clean install.
2. Add the build and submit it for review
Apple’s current external-tester instructions give this path:
- Open App Store Connect → Apps → your app → TestFlight.
- Select the external testing group.
- Choose Add Builds.
- Select the platform, version, and intended build.
- Enter What to Test and any relevant localizations.
- Decide whether to select Automatically notify testers.
- Select Submit Review or Start Testing, whichever App Store Connect presents for that build.
The required role is Account Holder, Admin, or App Manager. App Store Connect allows only one build of each version to be in TestFlight App Review at a time.
Apple says the first build you submit requires a full review; later builds for the same version might not. “Might not” is important. Don’t build an automation or launch promise around instant approval. Submit the exact build, then follow the status App Store Connect assigns.
3. Read the TestFlight review status literally
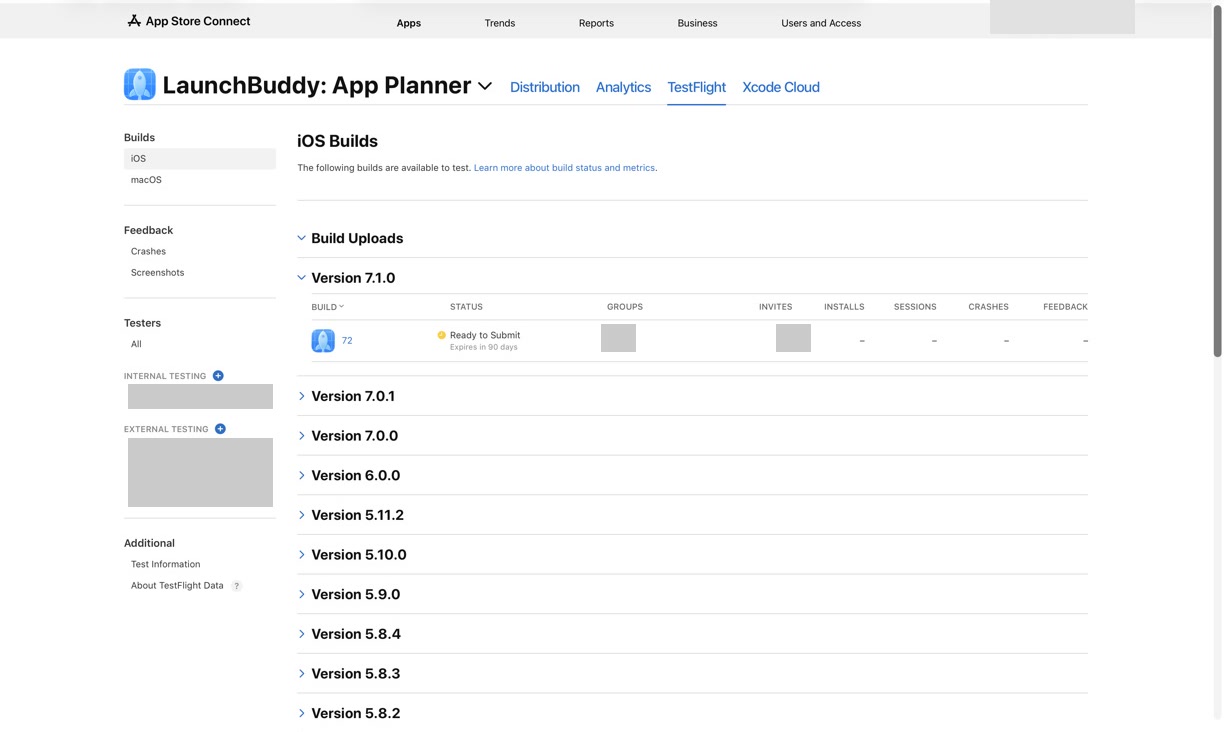
The useful TestFlight statuses form a state machine:
- Missing Compliance: required export-compliance information is absent. Complete that action before treating the build as review-ready.
- Ready to Submit: the build can go to internal testers or be submitted for external TestFlight review.
- Waiting for Review: Apple has received the TestFlight review submission, but external testing can’t begin yet.
- In Beta Review: TestFlight App Review is actively reviewing the build; external testing still can’t begin.
- Rejected: Apple rejected the build or its metadata. Apple’s TestFlight status reference says the rejected build can no longer be used and directs you to upload a new build.
- Ready to Test: the build is eligible for testing, but no tester is testing it yet. Manual notification may still be waiting.
- Testing: at least one group or tester is testing the build.
Keep three facts separate:
- Review approval determines whether the external build is eligible.
- Group assignment and notification determine whether intended testers receive access.
- Tester verification proves that the right person can install the right build.
Approval alone doesn’t prove distribution. Likewise, a copied public link doesn’t prove that the reviewed build is assigned to the group behind it.
4. Decide whether to notify testers automatically
When adding a build, Automatically notify testers tells App Store Connect to distribute it after approval. This works well when approval itself is the final release gate.
Leave automatic notification off when another decision must happen after review, such as:
- a coordinated beta announcement;
- a support team handoff;
- a final server-side configuration check;
- confirmation that the external group and public-link criteria are still correct; or
- a deliberate start date for a short test window.
If automatic notification was off, open the build after approval and choose Notify Testers. Apple says the status then changes to Testing, and external testers receive a TestFlight notification.
Before sending it, run a short post-approval gate:
[ ] Reviewed version and build still match the plan
[ ] External group is correct
[ ] What to Test is current
[ ] Required service or demo account is available
[ ] Feedback owner is ready
[ ] Test start and stop conditions are recorded
For a public beta, also verify the enrollment boundary with the TestFlight public link criteria guide.
5. Recover from a TestFlight Beta App Review rejection
If the status becomes Rejected, open App Review under General and read the exact issue before changing anything. Apple’s reply instructions apply to TestFlight App Review rejections too.
Classify the problem first:
| Rejection evidence | Recovery path |
|---|---|
| Missing or inaccurate metadata | Correct the identified metadata, reply with the specific change, and follow the resubmission action App Store Connect presents |
| Reviewer couldn’t reach a gated flow | Repair or clarify demo access, verify it from a clean state, and provide concise reproduction steps |
| Build behavior violates a guideline or is broken | Fix the binary, increment the build string, test the replacement, and submit that replacement |
| Request is unclear | Reply with a focused question and relevant evidence instead of guessing at several changes |
Apple’s TestFlight-specific status reference says a rejected build can no longer be used. Even when the issue concerns metadata, don’t assume that build remains eligible: follow the action App Store Connect presents and prepare a new build when it requires one. If behavior in the binary must change, create and test a new build.
Use a reply that makes verification easy:
Issue addressed:
Exact change:

Steps to verify:
1.
2.
3.

Expected result:
Version and build:
Don’t claim the problem is fixed merely because you edited a field or uploaded a replacement. Re-run the reviewer path, then state what you verified.
6. Don’t replace a waiting build without evidence
A waiting status is not, by itself, proof that the upload is broken. Replacing the build can discard a tested artifact, force new instructions, and create another review handoff.
Use this decision rule:
- Keep waiting when the submitted build is still the intended artifact and App Store Connect shows no required action or rejection.
- Correct metadata when Apple’s message identifies a field or access problem that can be fixed without changing the binary.
- Submit a replacement when the build has a verified defect, wrong configuration, or wrong scope.
- Escalate to Apple when the displayed state is contradictory or remains unexplained after you have checked the official status and messages. Include the app, platform, version, build, submission time, current status, and what you already verified.
Avoid publishing a guaranteed Beta App Review duration. Apple’s cited TestFlight documentation describes the workflow and statuses but doesn’t establish a separate deadline for every beta review. Plan a buffer instead of turning anecdotal review times into a promise.
7. Close the loop from approval to beta evidence
After notification, ask at least one intended tester to confirm:
- the invitation or public link opens the correct app;
- the expected version and build are available;
- the build installs and launches;
- What to Test shows the current instructions; and
- feedback is attributed to that build.
Record the result beside the review history:
Submitted:
Waiting for Review:
In Beta Review:
Approved or rejected:
Issue and resolution:
Tester notification:
Access verified by:
First feedback review:
Beta decision:
This is more useful than a single “Beta approved” checkbox. It preserves whether testers actually received the build and what evidence the beta is expected to produce. Once reports arrive, the TestFlight feedback management workflow helps turn them into current-release blockers, later tasks, or explicit no-action decisions.
Where LaunchBuddy fits
LaunchBuddy can keep this build record, version-scoped tasks, and a submission checklist together on iPhone, iPad, and Mac. The Free plan includes release planning, taskboards, default App Store submission checklists, and iCloud sync within its two-app and two-release limits; custom checklists require Pro.
LaunchBuddy doesn’t upload binaries, submit builds to TestFlight Beta App Review, display TestFlight review status, manage tester groups, notify testers, or resolve Apple’s review issues. App Store Connect remains the source of truth. Use LaunchBuddy for surrounding work such as “verify demo account,” “check build 118 review status,” “notify the onboarding group,” and “confirm one external install.”
Frequently asked questions
Is TestFlight Beta App Review the same as App Store App Review?
No. TestFlight Beta App Review controls external beta access. App Store App Review controls customer distribution through the App Store. Passing the beta review doesn’t record or guarantee approval of the eventual App Store submission.
Does every new TestFlight build require Beta App Review?
Not necessarily. Apple says the first submitted build requires a full review, while later builds for the same version might not. Follow the action and status shown for each build instead of assuming it will skip review.
Can internal testers use a build while Beta App Review is pending?
A build in Ready to Submit can be distributed to internal testers without waiting for external approval, provided it is eligible and assigned correctly. Waiting for Review and In Beta Review specifically block external testing.
Turn the review lifecycle into a version-scoped checklist, then organize your beta release in LaunchBuddy.